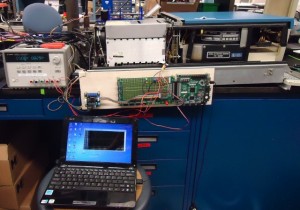
This page should probably be called “data recovery the hard way.” As part of my on-going Cray-1 Revival project, I put out a call to my fellow netizens to go search their closets for any old Cray-1 software they happened to have lying around. Somewhat unexpectedly, I actually received a flood of e-mails (and actual mails!) from retro-computing enthusiasts around the world. I got stacks of source code on paper and microfiche (!), digital source files for languages that don’t exist any more, and, perhaps most interestingly, I received a physical CDC 9877 80 Megabyte disk pack from a former Cray employee.
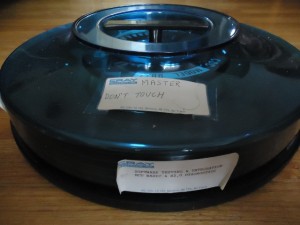 The mysterious disk pack arrives!
One of the things I would absolutely *love* to find is a copy of a real operating system for a Cray-1 (in digital, binary form . . . I actually have source code to the CTSS operating system on microfiche . . .but I digress). The tantalizing description on the disk’s dust jacket hints that it may contain such an operating system, so I naturally had to figure out a way to get the data off of it.
It turns out the disk is designed for a CDC 9762 disk drive. These were introduced in 1975, and were designed to work with mini-computers of the day from companies like Data General or DEC. They use a ‘Storage Module Device’ (SMD) interface to communicate with the outside world . . . think of a pre-historic version of SCSI or SATA. So . . . step 1 . . . find a CDC 9762 disk drive.
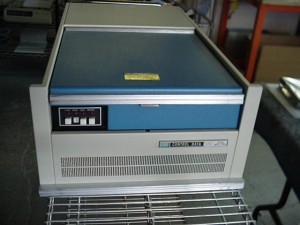 A CDC 9762 Disk drive in pristine condition
It turns out this is easier said than done. A crawl of the internet turned up two possible sources: A company in California that specializes in old hardware had one, and it was in beautiful condition, but it was also several thousand dollars more than my hobby budget (of approximately $0 USD). I also found a small start-up computer museum in Texas (the awesome Museum of Information Technology at Arlington) that happened to have a handful of these thing sitting in storage somewhere. Just getting the drive to NYC would be pretty expensive though (a CDC 9762 weighs about 100 lbs of pure awesome). So, step 1 – get a disk drive. Step 0 – get sponsorship!
Fortunately, my needing sponsorship happily coincided with my needing a final project to do for my graduate work. Special thanks go to Columbia University and the wonderful John Kymissis, who sponsored me for this project (and gave me space in the awesome CLUE lab to work). Sponsor-in-hand, I was able to work out a deal with the museum to borrow two CDC 9762 disk drives, a CDC TB-216A Field Test Unit (FTU) and a spare disk pack to test with. I was also able to obtain a super-rare CDC “CE” pack – a special type of disk pack needed to calibrate and align the drive’s 6 read heads when you’re working with the FTU.
My initial plan had actually been to try to buy a magnetic sensor, and then build a little robot to position it over the disk while I slowly measured it. It turns out that the magnetic ‘bits’ are so small (about 4 x 50 microns each) that your sensor can only be a few microns above the surface. There’s basically no way to rigidly position a sensor that close without crashing into the disk surface, so you need a sensor specifically designed to ‘fly’ above the surface of the disk like a miniature airplane wing while it spins underneath. This takes a non-trivial amount of engineering effort – hence, I really needed a disk drive with sensor heads designed to fly above the surface of my disk pack.
The Equipment Arrives
With about five weeks left in my project, a truckload carrying 400 lbs. of 35-year old computer equipment arrived at the lab. Step 2 – time to get cleaning! It turns out that these particular drives had spent the last two decades or so in what might generously be called ‘non-archival’ conditions. Time had not been kind to these two. This is a good time to remind the reading audience that disk drives are extremely precise machines. They have extremely tight tolerances, under the best of circumstances they require regular maintenance from trained personnel, and these particular drives had an ‘expected lifetime’ of 5 years or so before they were supposed to be retired (for those keeping track at home, that deadline passed in 1981!). If any particles bigger than a micron sneak under the disk head while it’s flying, it can cause the head to ‘crash’ into the surface and forcibly carry a track or two of your data to that great Recycle Bin in the sky.
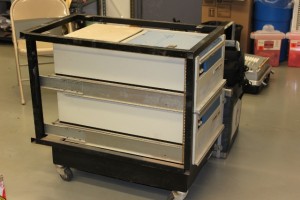 400 lbs of awesomeness fresh off of the UPS truck!
I picked the disk drive with the fewest hours on it as my victim . . . er . . . target . . . and got to cleaning. CDC, in their infinite wisdom, had lined the entire machine with some sort of noise-canceling foam that had not aged gracefully. Anything stronger than a gentle breeze would cause the foam to instantly crumble into dust. Given that we’re trying to avoid micron-sized contamination, all of the foam had to go. The machine also got a thorough vacuuming / scrubbing / swabbing / dusting, and both of the air filters got cleaned/vacuumed as well as possible.
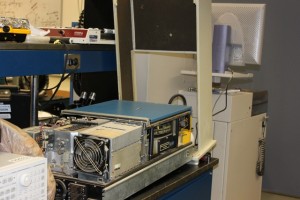 The disk drive opened for cleaning (with horrible foam visible)
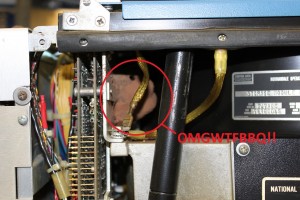 A ‘mud-dauber’ wasp nest . . . found during ‘debugging’
At this point, I would also like to point out that when I acquired these disk drives, I thought I had full electrical schematics for the machines. As a reasonably competent engineer, I was confident I could debug just about anything as long as I had schematics for it. In the course of cleaning my drive, I came to the realization that these drives were actually ‘first generation’ models, and the schematics I had belonged to a later model (with the same name, of course) with completely revamped electronics.
Without schematics for the drive, I set about trying my luck with debugging. When finally powered up, the machine instantly turned on its ‘fault’ light and became unresponsive. An internal status panel indicated it was a ‘voltage’ fault, and I noticed that a fuse on the drive’s +20V power supply had blown. Approximately 5 fuses later, I decided that there was probably a short on the power supply somewhere. I just started unplugging logic cards until the short went away, and I was eventually able to track the bug down to the card installed in slot 1 of the drive. I unfortunately didn’t know what the card did, but I was able to replace it with a donor card from my ‘spare’ drive that still seemed to be in working order. Immediately thereafter, I also noticed that the lubricant on the head assembly bearings had gradually degraded into some form of cement, and was preventing the huge voice coil from actually moving the heads when it tried to seek (and causing yet another fuse to blow!).
A change of direction
At this point in the project I had spent 3-4 weeks cleaning and debugging, and my hopes of building a nice digital interface to talk to the drive were rapidly fading. With about two weeks left, I decided to just take matters into my own hands and bypass the drive’s control and positioning electronics completely. I was paranoid about wasting my opportunity to read my disk pack, so I decided to just go overkill and *ensure* that I copied the data in some form. What kind of overkill are we talking here? Well, let’s throw 35 years of technological advancement at this sucker!
I built a robot that would manually move the head forward 1/5200th of an inch at a time (there are 400 data tracks per inch, so this gives me a whopping 13 steps per data track!), while a high-speed analog-to-digital converter would take the analog signal straight from the drive’s read amplifier and buffer it into an FPGA at a blistering 80 million samples-per-second (like I said earlier, the theme here was overkill…the data was only changing at ~10 MHz or so). From there, the data would get fed back to my computer over a high-speed USB connection, and I could just post-process the hell out of it later.
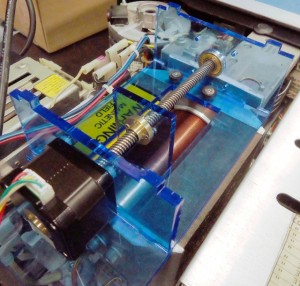 My robot mounted behind the drive’s positioning voice coil
For those of my readers involved in the 3D-printing scene, they might recognize my positioning robot as a modified Z-stage from a Makerbot Thing-o-Matic. Makerbot Industries is just an awesome company, and I definitely couldn’t have pulled this off in a few days if their office hadn’t been a short subway ride away.
 The electronics: 1) The Spartan-3E FPGA board, 2) The high-speed ADC, and 3) the Makerbot Stepper motor controller
The final setup with everything mounted
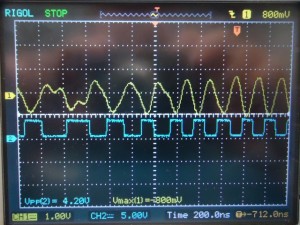 An oscilloscope shot of the incoming analog data and the output of my digital converter. Now that’s good data!
Remarkably enough, this scheme actually worked pretty well. It took about three or four hours, but I was able to image the entire disk pack. Of course, that left me with a 35 gigabyte ‘magnetic image’ of the disk (which the great folks over at the Internet Archive have kindly agreed to host for me), which isn’t quite the Cray software I had hoped to recover. Remember, baby steps! I highly encourage my more curious readers to download some of the data and play around with it – the modified-frequency-modulation (MFM) encoding technique is quite interesting. Each file is a 67 millisecond recording, sampled at 80 million samples/second, for every step, for every head (about 55,000 total!). If the voltage coming out of the disk drive was positive, a “1” was recorded, if it was negative, a “0” was recorded.
The recorded data is also a nice source of post-modern art for your wall!
We’ve got 1’s and 0’s . . . now what?
This was far enough for my school project (final report here!), but I still *really* wanted to recover some useful data out of this whole thing. How does one go about converting a stream of not-even-1’s-and-0’s (the data is actually encoded in the relative spacing of the pulses, as you can see in the pretty picture above) into useful data? The data on the disk is stored in 823 concentric ‘tracks’ per surface, and then each track is subdivided into some number of ‘sectors,’ with each sector having a small header section followed by some amount of data. While I sat there pondering strategies for teasing this thread of useful data from the haystack I had just recorded, someone else (thankfully!) beat me to the punch.
When I sent my data over to the Internet Archive folks, they did a nice write-up on their blog about the project. Behold! The power of the Internet! A guy I had never met named Yngve AAdlandsvik (I have no idea how to pronounce that) on the other side of the world (actually, Norway) downloaded my data set and started playing with it. It turns out he had some free time, and was *really* good at this sort of thing. About two days later, he had not only figured out the data format (512 Bytes-per-sector, 32 sectors-per-track), but he had figured out the header format and error-checking system as well! About a day after that, he sent me a script that could read in my digital haystack and find (and check for errors!) all of the data sectors in it! I’m still kind of shocked how quickly that happened, as I had already mentally prepared myself for months of drudgery to try to do the same thing. Score 1 for crowd-sourcing!
If any python hackers want to play with the script themselves, they can get it here.
So we’re getting closer, but we’re still not quite there. For one, we still don’t actually know if there is anything on the disk. It could have been erased and re-formatted 30 years ago for all we know. We’re light-years ahead of where we started though. We’ve managed to convert platters of rust into nicely formatted sectors of bytes. Now we need to go from bytes to files. Hopefully I’ll be able to post the raw ‘sectors’ up here soon (my computer will probably take another day or so to extract all of the data) for people to play with.
UPDATE: Success! I’ve got the data from heads 0-4 processed and uploaded for everyone’s perusal. I’ll hopefully upload the data from head 4 soon when it is finished processing. The data from all 5 heads is now uploaded. Looking at the data in a hex editor, I actually found a few ASCII strings! From Head_0/track_1/sector_5: “PARCEL = WW FIELD = X PASS = YYYYY ”
Head_4_data.zip (It looks like the first 20 or so tracks are missing. These may be recaptured later.)
Now all I need to do is convert this into useful files =)
UPDATE 2:
Although this disk pack didn’t contain anything terribly useful, the attention it attracted turned up a similar disk pack with an intact copy of COS 1.17 on it! Read about it here.
All in all, this has been an incredibly interesting exercise in digital archeology – and made me acutely aware of how ephemeral our digital data can be.
